
What is a header and a sticky header?
A sticky header is a menu or navigation bar that stays at the top of the page no matter where you scroll. In other words, a “fixed” header. This feature is useful for users because it enables them to easily find their way out of a page no matter where they are. Without easy access to the navigational panel, the user experience can become stressful. Like most things, when a problem is solved well, the problem and solution both go by unnoticed. That’s what we want! Personally, I’ve left websites solely because simple navigation options were not available, and in some cases I’d even rather call the company than deal with their website.
In this tutorial we’ll go over how to make a sticky header using HTML and CSS. For advanced animated effects, we’ll add some Javascript at the end. For those who don’t already know, HTML is what sets the structure of the website, CSS gives it color and traits, and Javascript adds animations and behaviors — as explained in W3Schools. In terms of browser compatibility, it looks like everything in this tutorial is compatible with current browsers. A good tip for web development is to test along the way, not just after you’re done adding the coding that you think you need. Otherwise, something could go wrong and it’ll take longer to pinpoint exactly what the problem is. So, take it slow. Now, let’s get to the coding and building!
Start your HTML document
If you don’t already have an HTML document thrown together, don’t forget to have the proper <!DOCTYPE html> tag as well as <head> and <body> tags. Best practice tip: name the file “index.html” and put all the new files you will be creating into one folder, otherwise there will be problems with linking.
1. Use a <div> inside a <div>, inside another <div> tag. The inside most <div> is for content, and the encompassing <div> is the content’s container.
2. Give the content’s parent <div> a class called “header”.
<!DOCTYPE html>
   <head>
     <title>sticky header</title>
   </head>
   <body>
    <div>
     <div class="header">
      <div>HEADER CONTENT</div>
     </div>
    </div>
   </body>
</html>
Start your CSS file
A CSS file doesn’t need a particular set up other than referencing the proper element and adding styles to the corresponding elements. Best practice tip: name the file “main.css”.
1. Refer to the <div> class named “header” and add attributes and values shown below.
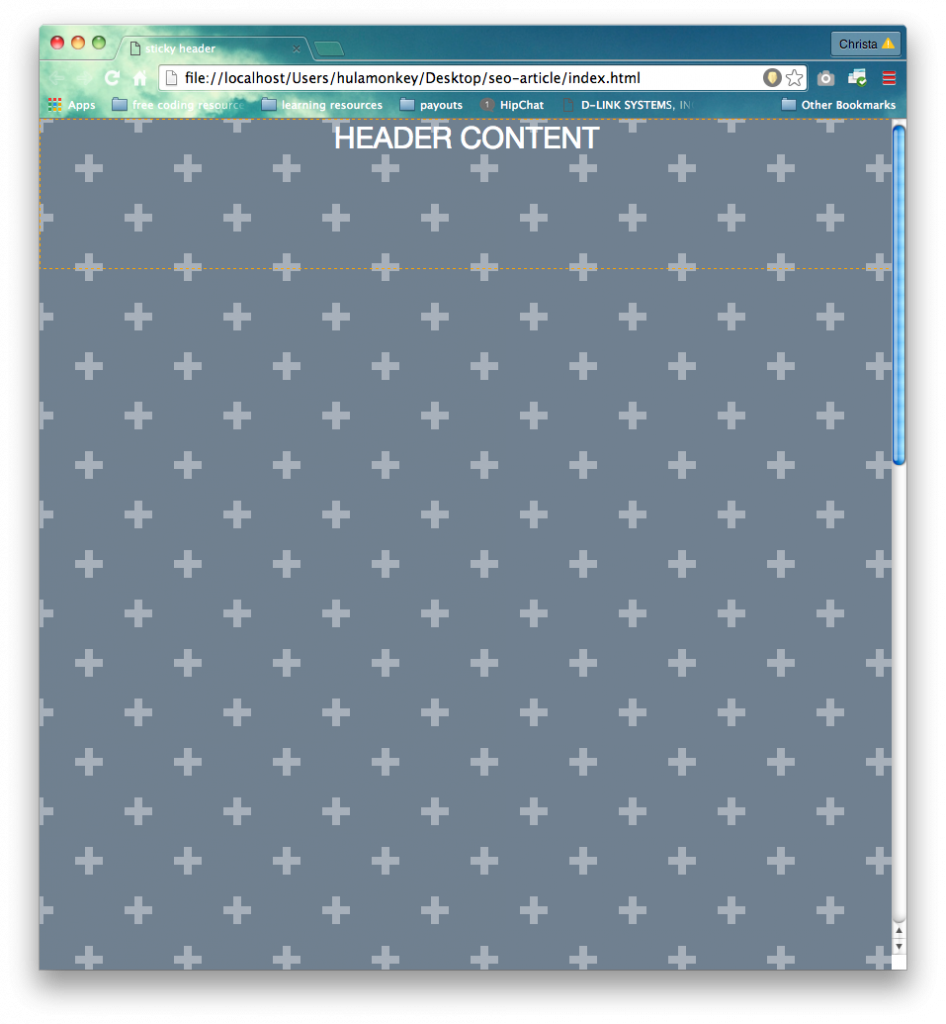
2. Add a couple attributes and values to the body that will help you see that the header is sticking. I added a patterned background. The most important part is adding the “position: fixed;” attribute and value. That’s what keeps that <div> stuck to the top of the window, thus creating a sticky header. Adding a big number to the body’s height will allow for scrolling so you can test the functionality of the sticky header. I picked 2000px, yours can be just over 800px. Whatever will give you a scrolling capability in your window will do just fine.
body {
 height: 2000px;
 margin: 0;
 background:
 radial-gradient(circle, transparent 20%, slategray 20%, slategray 80%,
transparent 80%, transparent),
 radial-gradient(circle, transparent 20%, slategray 20%, slategray 80%,
transparent 80%, transparent) 50px 50px,
 linear-gradient(#A8B1BB 8px, transparent 8px) 0 -4px,
 linear-gradient(90deg, #A8B1BB 8px, transparent 8px) -4px 0;
 background-color: slategray;
 background-size:100px 100px, 100px 100px, 50px 50px, 50px 50px;
}
.header {
 font-size: 30px;
 color: #FFFFFF;
 border: 1px dashed orange;
 position: fixed;
 height: 150px;
 width: 100%;
 text-align: center;
}
3. Link to the CSS file from the HTML file using the following code inside the <head> tag:
<link rel="stylesheet" type="text/css" href="main.css">
Animating your header with a JS file
If this is already a bit much, then no need for fancy animations. But if you want to kick it up a notch, you can try animating the header with Javascript. For a crash course in Javascript, visit < https://www.w3schools.com/js/ >. W3Schools is a great resource for most coding questions in general. Starting a JS file doesn’t require any particular set up either. Best practice tip: name the file “main.js”.
1. Add the following script to the JS file. (Remember: this script references names that I’ve created, so remember to adjust to your own reference names)
$(window).scroll(function() {
      if ($(this).scrollTop() > 1){
      $('.header').addClass('sticky');
      }
      else{
      $('.header').removeClass('sticky');
      }
});
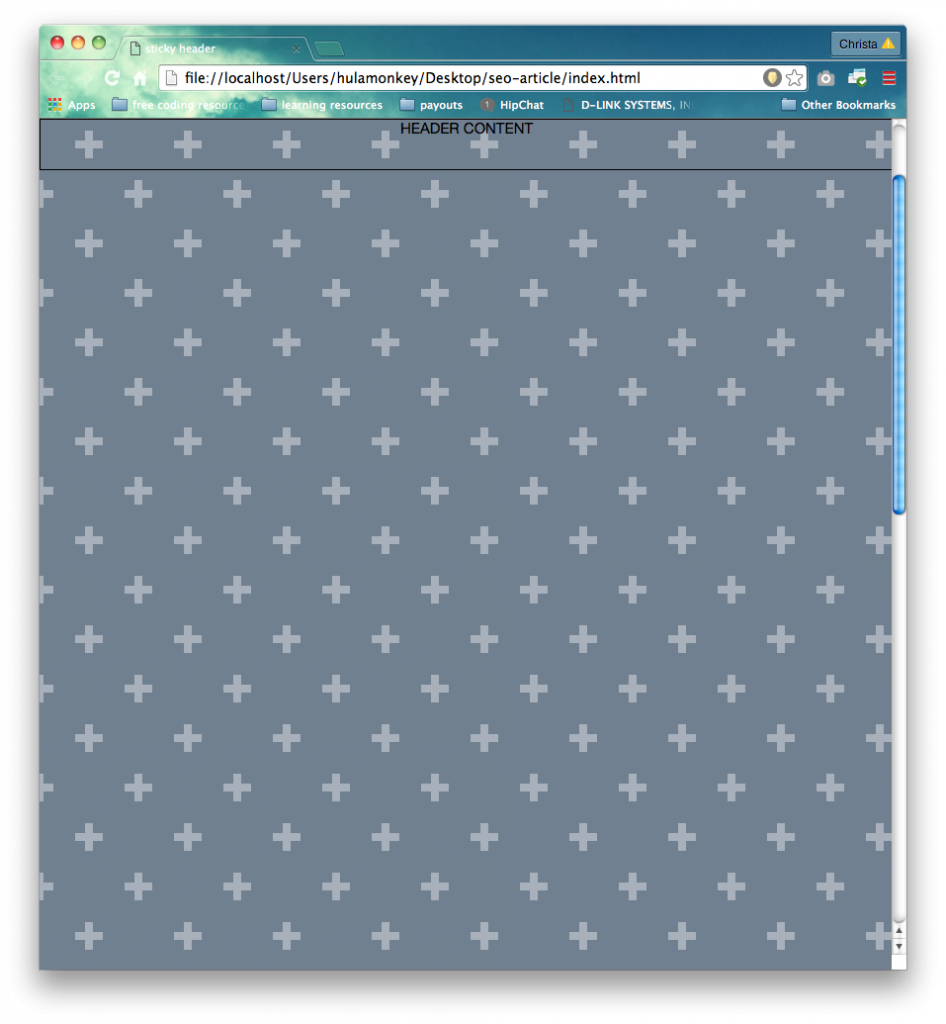
2. Add different CSS styling for a second state of the header into the CSS file by referencing the header by a different name, in this case “sticky”. Then add attributes and values you’d want on the header as the user scrolls down the page. Don’t forget you definitely need the “position: fixed;” attribute and value. You’ll also notice a new attribute that says “transition: all 0.4s ease;” and that’s what animates the header between the static and scrolling states. Feel free to play around with the number to see how it affects the timing of the animation.
.sticky {
    font-size: 15px;
    color: #000000;
    border: 1px solid black;
    position: fixed;
    height: 50px;
    width: 100%;
    transition: all 0.4s ease;
}
<script type="text/javascript"
src="http://ajax.googleapis.com/ajax/libs/jquery/1.11.0/jquery.min.js"></scri
pt>
<script type="text/javascript" src="main.js"></script>
3. In order for this whole animation to work, you also need to reference two JS files, one in the web and the “main.js” file. The web JS file contains all the data you need to make this header animation fancy. The order of the file links matter so keep it as is.
Here are screenshots of what the sticky header will look like.
Other types of sticky headers
For other great tools to learn and test coding, try Codepen. It runs the code as you type so you can see the changes without refreshing the page. You can also read other peoples’ codes and play with what they have to make it your own.
If you want to make a sticky header that uses a visual trick, try using this pen. It uses some Javascript but very little and it takes advantage of the visual medium by creating an illusion of sorts. It looks professional and worthy of any website you might be working on. If you’re looking for animations that appear more advanced, maybe try this pen. The banner disappears gracefully as you scroll down and reappears when you’ve scrolled all the way to the top. It’s pretty great what you can create with a little coding.
Conclusion
In conclusion, sticky headers are great for navigational help and there are fun ways to put them together. Using Javascript for the animating can seem harrowing but it does make a big difference for something to animate between states. If Javascript is stressing you out though, go with something you understand and that works! Always hold functionality over design. Because when it comes down to it, it’ll be easier for you to debug when the time comes for glitches. Luckily, for a sticky header, the minimum you’d need is HTML and CSS. Hopefully this article has helped you in your web development adventures!